


Magic Coating Paper for Durable Decals
Magic Coating Paper for Durable Decals - Magic Coating Only (requires Decal Paper) / 1 is backordered and will ship as soon as it is back in stock.
Couldn't load pickup availability
Delivery and Shipping
Delivery and Shipping
Shipping
Items are usually shipped within 2 business days, some custom made items can take up to 2 weeks
When do you pack and post my order?
We pack and post most days before 11am.
Can I come and collect my order?
Certainly, just give us 24-48hours notice to confirm. You may collect form Clifton Springs (near Geelong), Victoria, you can leave a note when you pay for your order as to when you would like to collect. Pick ups are fine most days if paid for and just collecting. Collections at other times can be left out for you by arrangement.
We are in Ocean Grove / Clifton Springs
Our warehouse is in Ocean Grove and home office in Clifton Springs. We have a small showroom in Clifton Springs (as we look into a new venue). Pick ups are possible and local delivery around the Bellarine Peninsula is possible by arrangement.
Returns
Hey - we know you are terrific, but some of our other buyers don't realise if they have a problem, we will always fix it, but if you are nice to us in your messages, we will fix it feeling happy.
We accept returns if the item is faulty or for personal change of mind.
For faulty or damaged items: We are so sorry your item(s) has been damaged and we would love the opportunity to fix the problem with you. Please send us an email describing the problem, with a photograph of what has happened to sales@renascentcollege.com and we will discuss with you personally the best way to solve your concerns. Please do not send them back to us without communicating with us. Rest assured we are here to assist you and want your entire experience shopping with us to be as happy as relaxing in a warm bath.
For change of mind:
Sometimes you accidentally buy the wrong item or just don't like it. That's OK, we want you to be happy.
To be eligible for a return, your item must be unused and in the same condition that you received it. It must also be in the original packaging. You need to contact us within 30 days of receiving the item(s).
You will need to return the item at your expense and we recommend tracking numbers to ensure it is received. If you would like it replaced with a different item (eg you bought laser paper for an inkjet printer), we can assist with this.
Several types of goods are exempt from being returned.
- Perishable goods such as food, flowers, hand made soaps,
- DVD's or Correspondence Courses cannot be returned (but if there's a problem, we will fix it with you)
Additional non-returnable items:
- Gift cards
- Downloadable software products
- Some health and personal care items
- Any item not in its original condition, damaged or missing parts for reasons not due to our error
- Any item that is returned more than 30 days after delivery
To complete your return:
We require a receipt or proof of purchase, (just telling us you bought it on this website will enable us to locate your sale) and for you to contact us prior to returning the item(s).
Refunds for change of mind:
Once your return is received and inspected, we will send you an email to notify you that we have received your returned item. We will also notify you of the approval or rejection of your refund. The only reason for a refusal would be if the item arrived back in a non saleable manner / used / damaged.
If you are approved, then your refund will be processed, and a credit will automatically be applied to your credit card or original method of payment, within a certain amount of days or we can issue you a store credit if preferred.
Late or missing refunds (if applicable)
If you haven’t received a refund yet, please check your bank account again.
Then contact your credit card company, it may take some time before your refund is officially posted.
Next contact your bank. There is often some processing time before a refund is posted.
If you’ve done all of this and you still have not received your refund yet, please contact us at sales@renascentcollege.com.
Sale items (if applicable)
Only regular priced items may be refunded, unfortunately sale items cannot be refunded.
Gifts
If the item was marked as a gift when purchased and shipped directly to you, you’ll receive a gift credit for the value of your return. Once the returned item is received, a gift certificate will be mailed to you.
If the item wasn’t marked as a gift when purchased, or the gift giver had the order shipped to themselves to give to you later, we will send a refund to the gift giver and advise them of your return.
Sssshhhhh, if you friend gave you something and you just don't like it - hey it happens! Don't worry, we will let you return it and swap it over for something else you like better.
Shipping
To return your product, contact us for the return address (Clifton Springs)
Please ensure you include a note with the reason for return and what you would like to do about it and all your contact details including address, email and phone number. Without this we may not be able to work out who and why and it may slow/halt your return process.
You will be responsible for paying for your own shipping costs for returning your item. Shipping costs are non-refundable. If you receive a refund, the cost of initial shipping will be deducted from your refund.
Depending on where you live, the time it may take for your exchanged product to reach you, may vary.
If you are shipping any item(s), you should consider using a trackable shipping service or purchasing shipping insurance. We cannot guarantee that we will receive your returned item.
Our prices are great, we support fair trade and manufacture locally wherever possible and we have a great team of friendly creative people you can chat to for inspiration and advice.
We are here for you - Bathed in Love !
Magic Coating Paper for Durable Decals
Description
Description
*PLEASE NOTE - for orders of 40 or more sheets - due to constant fraudulent credit cards, unless you are known to us, payments can only be made via bank deposit, please select bank deposit at checkout and pay this way - thank you for understanding
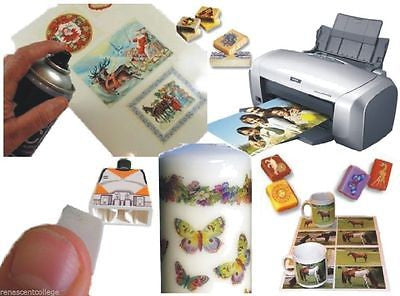
A4 size sheets of MAGIC COATING DECAL PAPER to add durability to Water Slide Decal Paper.
Water slide transfers / decal Papers + Magic decal coating paper
PLEASE NOTE: You will need Waterslide decal paper to use wqith this product, this adds an extra layer of durability, please look at our waterslide decal paper listings also
A Great new product designed to be used in conjunction with Renascent decal paper
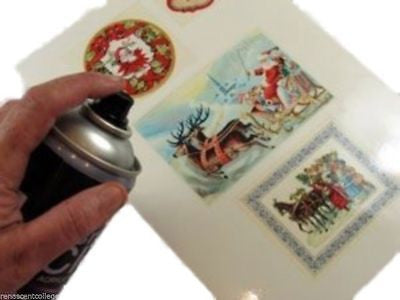
Designed to replace the use of acrylic clear coat spray and to add strength and durability, including microwave use.
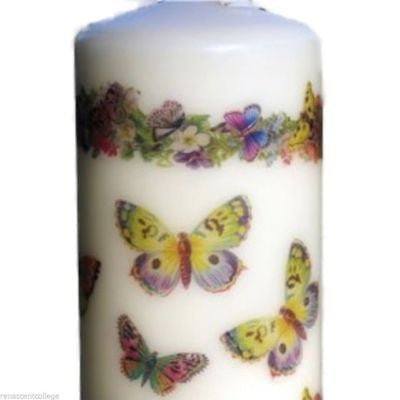
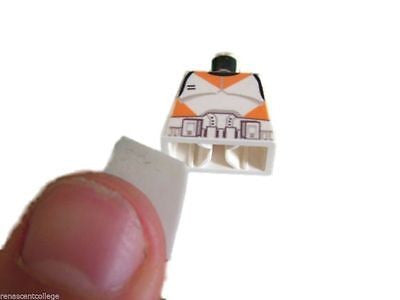
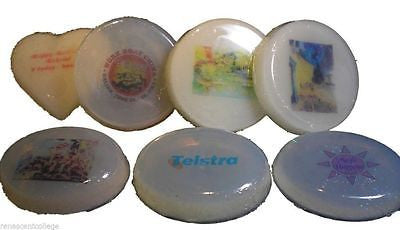
For soap, candles, wood, ceramics - make your own - personalise any object, create your own gifts or start a new business!
-
See our other water slide decal paper listings to save $'ss when you buy larger qty's.
-
Our paper is NOT from China or Hong Kong. A lot of this inferior quality paper is sold online
-
Ours is perfect quality High Gloss paper. Simple to use and perfect results everytime.
* PLEASE NOTE - You require decal paper to use with this product. From the drop down list you can purchase these together or just the magic coating paper if you already have the decal paper.
Magic Photo Decal Paper Introduction:
We are proud to introduce ‘Magic Photo Transfer Decal Paper’ to the world which does not require any conventional sublimation equipment but provides realistic photo quality decals and a lot more flexible choices of decal items. It can be used with ANY SIZE, SHAPE and COLOR items of CERAMIC, GLASS, TILES, PLASTICS, METALS and many other items with gloss finish surface. Magic Photo Decal Paper is easy to use with nearly zero failure whereas the conventional sublimation process gives you a lot of headaches with maintenance and high failure rate. No specially pre-coated mugs, no press machines, no special inks, no restrictions on color and size, no maintenance !
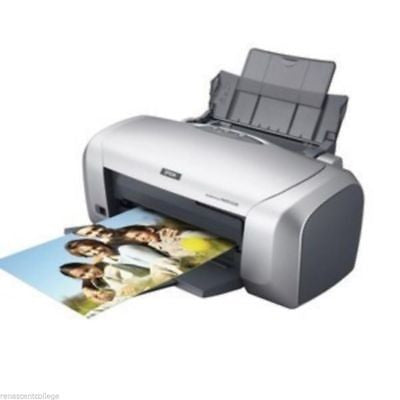
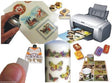
You can utilize ordinary office / home equipments such as inkjet printer, laminator and oven (or microwave).
You can easily transfer your desired photos or images onto anything you like without any significant investment or special equipments. You will be surprised with the fantastic results of the high gloss and solid decals of photo images onto mugs, plates, tiles, glass and any smooth surface with no spray coating required.
Product Composition : Decal Paper (Inkjet Clear or Inkjet White printed on the back) + Magic Coating Paper covered with protection paper.
Preps. : Computer, Inkjet Printer, Laminator, Electric Oven (or Microwave or Hair Dryer), Rubber Squeegee, Scissors, Water, and Tissue.
How to Use :
- Edit a photo or image with your graphic software such as Photoshop or Illustrator in your computer. Do not reverse the image as it will be applied right way up on the item. *Alternatively, you may reverse it when you apply it on the other side of clear glass sheet. e.g. Car window interior (with or without tinting).
- Set the paper condition of the printer to size ‘A4’, ‘Thick photo paper’ or a similar option and print the decal image on glossy side of the inkjet decal paper using your Color Inkjet Printer. Dry the printed decal with a hair dryer for immediate use, or let stand for around 2 hours.
*Clear inkjet decal paper can be used on white or light color body. White inkjet decal paper can be used on black or dark color body.
- Cut out the decal with scissors around design carefully. Place decal face down onto gloss side of coating film then place then place the protection paper, gloss side down on top. *The gloss side of protection paper must face down to the decal paper and coating paper.
- Put them into the laminating machine carefully and laminate. Low speed laminating at low temperature, 110℃∼120℃( 230℉∼250℉ ), will make the laminated paper easier to handle when you cut and apply it. *Slow feed at low temperature and faster feed at higher temperature.
- Cut out the coating paper with scissors around the design after removing the protection paper. *Leave about 1~2mm margin to have better water protection effect and smoother finish.
- Wet the paper of printed decal (printed side) with some wet tissue first. Slide off the paper after 30 seconds approximately.
- Dip it into clean water to wet the other side of paper. *Use warm water in cold weather.
- Place the decal face down onto the cleaned mug, and squeegee it by rubbing gently for about 1 minute and then slide off the backing paper. * Get the mug wet before you apply the decal and do not try to remove the backing paper fast. It can be easily removed after 1 minute. It is very important to clean off the glue left around the decal with wet tissues. Any glue left will cause yellowy spots on the image after baking.
- Place the decal on right position by moving around with hand and rub up and down with the squeegee rubber to remove any water or air bubbles under the film completely. *Be careful, any water or air bubbles left over could create a problem after baking. So, dry well before baking process.
- Bake it in the microwave for about 5 minutes at low temperature(3 minutes at high temperature) or in the electric oven for about 7~8 minutes at 160℃∼180℃. You can bake again to have better result of gloss and strong decal after cooling. You will have the similar result with hair dryer at high temperature for about 5 ∼10minutes if your items can not be put in microwave or too large to put in. Put some water on the plate of microwave for glass plate or ceramic plate to avoid breakage. The baking time and the temperature above are only guidelines and we recommend you to start baking at lower temperature by 10~20℃ if you do not know the exact operating temperature of your oven or microwave. Longer baking will give you better results but over-baking could cause shrinkage problem of images.
*You can apply it the same way on other material such as ceramic tiles, glass mugs, glass tiles, metal plates, coated wood and acrylic plate etc. Do not use it for exterior products as water based inkjet inks can be easily faded off by sunlight.
*Information
- Initial hardness of the decal may be weak, but will harden over time. Do not use a strong metallic scraper or scourer to wash it.
- The transferred images should not be in direct contact with food or beverage.
- Do not keep decaled item in water for more than 10 minutes.
- Do not boil it as decal may soften, use cold water when washing. This product is microwave safe but not dishwasher safe.
- Do not wash with volatile thinners such as MEK, Xylon, acetone, alcohol etc.
FAQ
Q: I get air bubbles or excess water underneath the image.
A: When you rub with a squeegee (or wet tissue), do it softly from the center to the edges, and make sure the edges decaled well before drying the mug.
Q: I get air bubbles between coating film and decal film.
A: Slow down the speed when laminating. Raise temperature a bit if your laminator has a fixed speed.
Q: Yellowy spots and less gloss than expected.
A: Wash, remove all excess glue left on the image using wet tissue before baking.
Q: The edges of image are shrunken when baked.
A: The baking temperature applied was too high or the decaled image was not dried enough before baking.
WHAT IS A DECAL AND HOW DOES IT WORK?
A decal consists of several layers of materials. A bottom layer of backing paper with its glue-like substance, an intermediate layer of printed colours and a top layer of lacquer coating (cover coat ). The backing paper is porous so it will absorb water. This softens the glue and releases the printing (which is held intact by the top coating). This allows the design to be transferred from the paper on which it was printed to the surface being decorated.
Payment & Security
Payment methods
Your payment information is processed securely. We do not store credit card details nor have access to your credit card information.
